Showing posts with label kidlitart. Show all posts

Friday, September 22, 2017

How We Got Started in Graphic Novels


Nelson Beats the Odds series designed and illustrationed by Traci Van Wagoner and Kurt Keller


Creative Medicine LogoNelson Beats the Odds was the first in a series of graphic novels we've designed and illustrated for Ronnie Sidney II at Creative Medicine.

In the spring of 2015, Ronnie came to us with a story that had really clear descriptive scenes for practically every sentence which made it difficult for us to do a standard picture book spread. It was shouting out for a graphic novel approach. Not something we'd done before or quoted for. Boy, are they a lot of work. We suggested this to the client, and he loved the idea. Since he was going to be presenting and showing to a grade school and older audience, he thought the graphic novel would go over well with them. So what began as 32 pages with 16 spread illustrations turned into 32 pages with approximately 170 - 180 illustrations.

Style Research

Since this was a new style and genre for us, it required research. Research and more research. We researched, and read, and googled, and studied, and sketched, and researched some more looking at graphic novels, comic books, styles, themes, directions, applications, etc. You can see some of the reference that provided inspiration on Traci's Pinterest page.

Character Design

Character design working with photos provided by the client. Nelson and his friends which are based on Ronnie, his friends, and his teachers.
Character Design sketches for NBTO by Imagine That! Design


Text Dummy and Symbolism

After getting some characters establishing, a text dummy is created where we break the text up into spreads and loosely sketch out the scenes.

Work begins with a text dummy for Nelson Beats the Odds, Imagine That DesignCharacter and scenes sketches for Nelson Beats the Odds, Imagine That Design


Creating the Cells, Scenes, and Factoids

After doing a series of sketches and designs, we created the cells in InDesign, knowing that the cells themselves were going to add to the creative design and message of the book. We outputted those as pngs and placed them as masks in Photoshop for our first round of sketches.

Nelson Beats the Odds cell design and layout by Kurt Keller at Imagine That! DesignSince this story is about the struggle of overcoming learning disabilities, the client wanted to have the theme of mountains in the imagery demonstrating the struggle of overcoming the odds. So we set about trying to integrate this element into the design. We created shapes and cells to help bring in this feel as a vehicle of communication.


Nelson Beats the Odds interior cell desgin and layout by Kurt Keller at Imagine That Design
Ronnie also wanted to capture the feeling of sneaking into the special education classroom so his friends wouldn't see him. So, we created a ninja feel with Nelson sneaking to class not being seen.

This is where Nelson finds a teacher who understands and helps him to grow and gain confidence.


We had the additional challenge of getting so much copy into the book. Not only did we have a story line, but since Ronnie would be using this book as an instructional tool, he wanted to include other information, question/answers, facts to back up Nelson's story. We decided to create new call out sections in yellow for Notes / Facts / Quotes.
Nelson Beats the Odds interior design by Kurt Keller at Imagine That Design

Getting the work done

Since we were also the book designers this gave us the ability to control both ends of the whole book making progress, working the illustrations and design together which gave it much more of a cohesive feel and made the project flow smoothly.

With the basics established, it was time to get into the nitty-gritty of completing the book. Here's a working screen shot from Photoshop showing several spreads in various stages of progress.
Nelson Beats the Odds work in progress by Imagine That! Design


Ronnie was very happy with the end result, so much so that he wrote another book and another so we now have a series of graphic novels. Tameka's New Dress with a colorful patterned dress as the vehicle for Tameka's confidence to stand up to bullies, and Rest in Peace RaShawn where we worked only in black and white with highlight colors to pack an emotional punch. This was an emotionally intense book to illustrate -- and that's another story. And speaking of another story, we have a new book for this series in the works. We'll share more about that later. 

For more behind the scenes information about the Nelson Beats the Odds, check out this post on Traci Van Wagoner's illustration blog, Celebrate the Little Things, Hard Lessons Learned.


Nelson Beats the Odds cover art by Traci Van Wagoner, designed by Kurt Keller, Imagine That! Design

About Nelson Beats the Odds:

Nelson use to think school was all about playing around and talking with his friends. When he learns that he’s been placed in special education, he fears being teased so he keeps his learning disability and ADHD diagnosis a secret. With the encouragement of his parents and assistance from Mrs. T., his special education teacher, Nelson pushes the boundaries and discovers his potential. His hard work pays off when he graduates from college with his social work degree.

Nelson Beats the Odds is an inspiring story that celebrates friendship, resilience and empowerment. The striking illustrations give life to Nelson Beats The Odds while the author’s story is perfect for students diagnosed with learning disabilities or mental health disorders. Imagine That! Design provided the illustration, layout & design and formatting services. The company is located in New York City.

This book and the others in the series are available at Creative Medicine :
http://www.creative-medicine.com/nelson-beats-the-odds.html
Or on Amazon
Check out Ronnie's Amazon page for links to all the books


 All images @Imagine That! Design

Monday, May 22, 2017

The Making of The Mermaid's Gift

In celebration of Mermay, we're sharing a post original posted on my illustration blog Celebrate the Little Things sharing my illustration process for The Mermaid’s Gift written by Claudia Cangilla McAdams, illustrated by me - Traci Van Wagoner, and published by Pelican Publishing.
 A version of this post can be found on Dani Duck: Artist Obsure as part of Smart Dummies.

After illustrating eight picture books and creating five dummies for my own manuscripts, each a bit of an experiment, I’m happy to say that I finally feel like I have a pretty good system worked out.


Quick read through — This quick read through opens my mind to the world of the story. I then let my imagination explore the possibilities without any limitations to specific pages or scenes. The process from first contact to contract takes a long time, so this story had a long time to percolate.

Reference researchPinterest is a ton of fun for this. I set up folders for each project and collect images for reference and inspiration. In this case, colorful Burano, Italy (look it up on Google. If you’re feeling blue, this place will perk you right up); lace, lots and lots of lace research; historical photos of Burano and the lace museum there. I even used Google Earth to walk around the island.

Character sketches — I work out clothes, hair styles, facial features, culture, and age. I sketch the main characters from a variety of angles, different facial expressions, moods, emotions, keeping mind the need to keep the main characters consistent throughout with the same clothes, hairstyle, facial features, eye colors, etc.

Text Dummy
— I print out the manuscript and break it up into 16 sections. I fold 9 sheets of legal or ledger paper in half and staple them in the middle with a special stapler I bought years ago for this purpose. I cut up the text and tape each section in its spread roughly where I think it might go, telling the story with the text — one chunk for the entire spread, or broken up with some on the left and some on the right. Since Mermaid is a retelling and set in the 1800s, I decided to go with a classic feel, keeping the text in blocks, but incorporating them into the illustrations. I played around with borders and copy blocks, but dropped that in the final sketch stage.

Brainstorm Scenes — blue sky thinking with my husband bouncing around ideas about the overall look, world, setting, perspectives, angles, pov, lighting. Playing with the best way to illustrate each scene adding to the story in unique ways. For this book I really wanted drama, which I achieved with lighting, angles, and unique perspectives.

“I love your boldness in composing the pages. Many illustrators are timid about the interplay between form and function, and your work is like a breath of fresh air.” ~ Johanna Rotondo-McCord, Artist.

More reference research — this stage is pretty much ongoing and so much easier now days. I remember the days of having to go up to the reference library on 42nd street to get images. For this project, I did a lot of lace research — patterns, tutorials, various types of lace, designs, styles, materials, etc. I think that all paid off since I have had many people ask how I created the lace, and have complimented me on the beauty and realistic feel of the lace.


Thumbnails — With sketchbook and ballpoint pen, I roughly block out the scenes I have bubbling in my imagination after the brainstorming session. With this project, I established a sort of zig-zag pattern through the spreads, leading the eye through the story with a variety of spots, full spreads and text placement that would keep the eye moving how I wanted.

Sketch Dummy — Sketch and explore scenes building on initial rough thumbnails. My ink sketches are rough at this stage. I scan those, clean them up a bit and print each spread as close to actual size as I can. With marker paper, several good ol’ #2 pencils, and a kneaded eraser, I set to work creating the final detailed pencil sketches. Marker paper is see-through without needing a light box, but not as smeary as tracing paper. I scanned those sketches and put them together back in their spreads. I cleaned them up, made pngs which I made into a pdf and emailed it to the AD. He came back to me with only a few revisions.


Value and Color Thumbnails — I made a contact sheet in Photoshop of the sketches on an 11x17 document. I added a layer with my paper in a gray tone, creating an overall stormy feel. A second layer for value, establishing mood, and a third layer for color studies. I created a limited palette, keeping in mind the stormy feel of the story and moving to a light and happy feeling in the end.

“You have perfectly captured the moods of the various scenes, giving the story "life" in your depictions of the throwing of the fishing net, the ferociousness of the storm at sea, the mermaid's creation of the lace, and so on.” ~ Claudia Cangilla McAdam

Final Painting Begins
— I paint in Photoshop with my own brushes, textured papers, and color palettes, plus a ton of layers. I could do a whole-nother post about the ups and downs of finishing a full book. There were days I thought I was brilliant, and days when I felt like a total fraud with no right to get to draw and paint for a living. Every book has this stage no matter how much I’ve learned and grown and figured out what I’m doing.


Finish the Dang Thing Already — And then comes the finishing. This may be the hardest of all stages for me. I have a resistance to finishing things. I don’t know why. That’s just the crazy way I am. One night my husband told me to sit and finish one at a time. I had the final highlights and finishing touches and fixes and whatnots to do. When I finished one I’d shout it out. I was reward with a DING-DING-DING and a compliment of some encouraging sort. Then it was back to the next one.


I finally finished them and sent them off to the Art Director. The end result: A love fest with my art, and an offer for another book. Cody and Grandpa’s Christmas Tradition written by Gary Metivier. You can read a guest post with Gary here.


I'd love to hear your thoughts or questions on my process. Or feel free to share how you work. Thanks for your visit.

Traci


Live, laugh, and learn!

Book Trailer

Get your own copy of The Mermaid's at:
Barnes and Noble
Pelican Publishing
Amazon

Monday, February 6, 2017

The Creation of Booker T. Bear's Hometown, Juneberry Square

Booker T. Bear's hometown, Juneberry Square illustrated by Kurt Keller and Traci Van Wagoner
Booker T. Bear's Home Town, Juneberry Square
The adventure of Booker T. Bear and his friend Dahlya Dragonfly all began in their hometown, Juneberry Square. Why the name and the pretty trees with white blossoms? In her original research for the series, the author, Jen Jellyfish, M.M., wanted to find a unique berry that's not commonly known. With delight she found there's a real berry called a juneberry. This discovery brought her such surprise and joy because her mom's middle name is June, which is the name she goes by, and the middle name of her daughter. The town's name, Juneberry Square, is a tribute to them.

Before sketching began, we received detailed notes for the illustrations for the series and for the first book. These are the notes for the first page of book 1.

Author notes for the illustration of Juneberry Square:
• Quaint but brightly colored town square that’s round; readers’ view facing into the square at street level, able to see shop fronts. So, only a horseshoe-shaped section of the shops will be visible, but the park in the middle will show the full-circle shape.
• Round grassy park as the center of the town square—full circle visible; park includes: fountain in the center, brick stroll path(s) leading to fountain, full-blossomed Juneberry trees, shading the park
flowers and grasses, the standard park benches, trash containers, birds, squirrels, etc . . .
• A roundabout road separates the park from the shops—a horseshoe roundabout since the view of the whole square is as though the viewer is standing on the street looking into the square from one end—stores on the other three sides of the roundabout. Make sense? 
• Fun, kid-inviting shops facing the park, lining the roundabout.
• DAHLYA’S DINER is the square’s main attraction—THE hangout—clearly identifiable among the other shops it’s nestled between The Bee-Nutty shop which is the secondary main shop of attraction
Booker-Dahlya, Grandpop, and Grandmop – on storyline page 1 – should appear, each posed at a different location in the square. For example, Grandpop cleaning the Bee-Nutty Shop window front? Grandmop seen from inside shop window? Booker and Dahlya at the diner front?

Booker always wears a brightly-colored, plain T-shirt. At various times he wears a matching ball cap. 
T-shirts and caps have no graphics or lettering.

We started the project with this knowledge and with the established character of Booker T. Bear from The Library Store, and the basic look for Dahlya Dragonfly.


Booker T. Bear reference image


The sketching began all loose and messy as we tried to get a feel for the town. Pages and pages of sketches later, we had a rough sketch we were happy with. We scanned that mess into the computer and cleaned it up in Photoshop. This is the sketch we sent to the client (Jen and The Library Story) for approval.

Juneberry Square cleaned up sketch by Imagine That! Design
Booker T. Bear, Juneberry Square cleaned up sketch


Booker T. Bear Juneberry Square rough sketch by Traci Van Wagoner at Imagine That! Design
Booker T. Bear, Juneberry Square rough sketch


Jen was thrilled with our vision for Juneberry Square, so we moved to finalizing the illustration. For the first step, we created a black line using Manga. We exported that to Photoshop and colored it in with bright fun colors and our signature texture. And there you have Booker T. Bear and Dahlya Dragonfly's hometown, Juneberry Square.
Booker T. Bear Juneberry Square Illustration by Kurt Keller and Traci Van Wagoner, Imagine That! Design
Booker T. Bear, Juneberry Square Final
Booker T. Bear Juneberry Square black line illustration by Kurt Keller and Traci Van Wagoner atImagine That! Design
Booker T. Bear, Juneberry Square black line


After we had completed the first four books in the series, Booker needed a website in order to share his adventures with the world. Jen enjoyed the toy store on the right, so she and the folks at The Library Store asked us to create a full toy and book store for the website.
 
Bee Nutty interior illustration by Imagine That! Design
Inside Bee Nutty Shop

Here's a little peek inside the Bee Nutty Shop. To interact with all the fun things inside and to see Dahlya's Diner and The Toy & Book Shop check out Booker T. Bear's website www. BookerTBear.com. Don't forget to buy a book or two while there and share in the fun with Booker and Dahlya on their adventures across the globe. 


updated 9/6/17

All images ©2016 Kurt Keller and Traci Van Wagoner, Imagine That! Design

Monday, January 9, 2017

Booker T. Bear Goes Live!

Booker T Bear, Let's Go! Illustrated by Kurt Keller and Traci Van WagonerWe're very excited to announce that Booker T. Bear's Website is up and running! Yay! Go check it out, buy a book or two, and have some fun exploring Juneberry Square. Books 1 and 2 will be available very soon and are available for preorder. The series was written by Jen Jellyfish, M.M. illustrated by the creative team at Imagine That! Design (Traci & Kurt) and brought to you by The Library Store, Inc.


 We'd love to hear what you think of Booker's fun adventures.

Booker T. Bear Book 2 A Hap-hap-py Day illustrated by Kurt Keller and Traci Van Wagoner
Booker T. Bear Let's Go Series Book 2
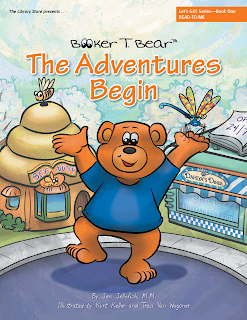
Booker T Bear, The Adentures Begin illustrated by Kurt Keller and Traci Van Wagoner
Booker T. Bear Let's Go Series Book 1

Friday, January 6, 2017

Arrr, Back To Work

Traci Van Wagoner illustrationHappy Friday! It's been our first week back at work in 2017 after a nice holiday break, and this pirate whipped us into shape with a good, "Arrrr, get back to work, matey!" He came from warm up sketches for a new game we're developing for Roosterfin Games.

We hope your first week back to work has been fruitful and full of adventurous fun.

Live. Laugh. Learn.